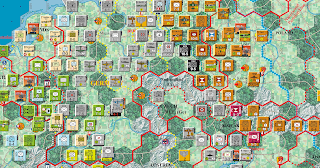
The Commonwealth launches ships including a battleship and produces in Calcutta a naval aircraft of US origin that will be used in the ground attack role. Italy deploys a motorised infantry corp, an excellent fighter and a good medium bomber. Hitler deploys a variety of units -mostly infantry - heavily in the Eastern Front. but some including a panzer corps returning from being blitzed in west Germany. He puts the new fighter unit in the last Ruhr factory city in German hands as there is only one other fighter in the Western Front. Japan deploys a good fighter and excellent naval aircraft (they are quicker to produce than new carriers with aircraft) and an anti-submarine escort vessel. China has a Communist mechanised corps placed in the mountains west of Sian and Lanchow militia.
The US has its usual plethora of units to place on the map and dismay the Axis. A marine corps with amphibious ship as well as 3 short and long range naval aircraft are ready for the Pacific. The Atlantic coast gets a heavy cruiser and a long range night fighter. A mechanised corps, paratrooper corps and a heavy transport plane are joined by an airborne and ranger division. The Dever HQ returns from its mishaps at sea last Turn. The USSR launches a sub at Vladivostok and 3 Siberian ski divisions deploy in Mid Siberia. A FTR2, a Guards infantry army, a katyusha artillery division and an engineering division are produced in Byelorussia, Moscow, Ukraine and Warsaw. Rumanian and Bulgarian volunteers arrive as well. De Gaulle blows a kiss at Hitler as in mid France, mainly in Paris, he puts down a heavy artillery division, an infantry HQ and two motorised corps. Will they head for the Italian or German fronts?
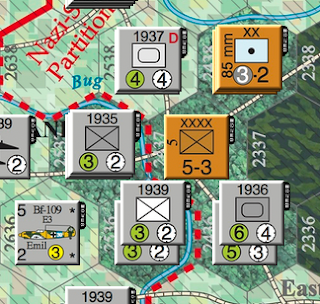
The Allies win Initiative. The Weather is Fine all over. China chooses a Land impulse. The Reds mechanised corps move into Sian and the Mao HQ moves west of Sian. The artillery in Sian bombards the hex east of Sian and disorganises the Japanese mechanised corps. They decide not to launch another attack on Kweiyang. Stalin chooses a Land impulse. He rail moves a guards infantry army into Konigsberg and moves the militia there to Bucharest. The katyusha and engineering divisions rail move closer to the Oder. Shturmoviks ground strike the lone infantry corps holding Breslau south of the Oder but achieve nothing. 4 Guards Banner armies attack it. Stukas with fighter escort try to lend support but the Stukas are shot down by mass Soviet fighters and the German fighter returns to base. The German corps gets blitzed onto the Production circle and the Soviets get a foothold south of the Oder in Breslau allowing them to strike north and undo the German defenders. The Slovakian corps in the Carpathians is attacked by many Soviet units but because of the mountainous terrain and air support it manages to suffer only retreat to Bratislava and disorganises almost half of its attackers. Air units move closer to the Oder. Timoshenko flips over to reorganise the katyusha and engineering divisions so they can be ready next Impulse.
The Commonwealth choose a Land impulse. They launch a long raid night bomber offensive against Hamburg which the Germans don't intercept. Braving weak flak they cause 2 build points of damage. In Burma they move forces towards Siam and the border with China. Many units are disorganised by the rough terrain. The Commonwealth armies surround Essen-Dusseldorf. The Luftwaffe fly the fighters there as in fighter bomber role. Despite this and the two infantry corps there the concentric attack is overwhelming and both defending infantry corps are destroyed with no casualties for the Allies and the British claim the red factory unit there. There is now a wide gap in the Western front for the Commonwealth forces to pour through. France moves most of its units in Central and East France towards South Germany. They rail move the Syrian cavalry unit to Aswan in Egypt to join a British anti tank division waiting there.
The US pays for a Land and Naval Impulse. The Commonwealth spends an Offensive Point to transport the Devers HQ in its Queens fast naval transport to Antwerp. The mechanised corps in the US travels to Brest and the paratrooper division goes with the new cruiser to Corsica. Transports take infantry and naval aircraft from the West coast US to the Pacific. Escorts go out. Subs go to the South China Seas and Bismarck Seas but fail to find convoys. US medium bombers with fighter escort support groundstrike the German infantry and artillery outside Munich. The Italian fighter in Munich tries to intercept but is shot down and the pilot killed. The medium bomber disorganises the dangerous railway guns and one of the infantry corps. Eisenhower HQ and the rest of the US troops in the southern pincer move north to cut the road to Nuremberg and encircle the German salient. The Commonwealth and French troops move to fill the gap they have left. Bradley HQ moves to Calais to board a waiting Transport. US forces along with Commonwealth and French support attack the centre of the German salient and blitz the Italian and German unit onto the production circle without loss. The air transporter flies the paratrooper corps to France. The night fighter rebases to Northern Ireland. The new long range naval aircraft rebases to Hawaii.
Hitler faces a very difficult situation.
He ground strikes the leading units of the southern US pincer with 2 stukas protected by the best Fighter in the game at the moment with 9 AA factor. The US can intercept withe 2 fighter 3s with 7 AA factors each (P38 Lightnings) but decides not to. Both US corps get disorganised. Next infantry in Leipzig move to re-establish a supply line for the salient who move slowly eastwards as they can only 1 hex due to being in the zones of control of Allied units. There's some shuffling of units in the East Front. Hitler considers a counter attack on the Soviets south of the Oder but the odds are not high and he worries about disorganising his own units making them easier for the Soviets to attack. Instead he moves the v Leeb HQ south into Vienna. Italy chooses a no-cost combined impulse. He moves escorts into the Italian sea. He moves planes into the West Med but doesn't search for convoys as he wants them there to intercept any movement into the West Med. He moves land air units to reinforce his South German front. He rail moves a militia unit protecting the toe of Italy to La Spezia in case the Allies try to invade the west coast of North Italy.
Japan chooses a Naval impulse. The Kido Butai main carrier fleet goes to Manila and is able to be active for the rest of the impulse. The excellent Emily naval aircraft goes into the 4 box of the South China seas to be able to subhunt. Escorts go out including for a convoy in the Solomons sea. Subs move out to cut off Australia from the US. In the Coral sea, Solomons and New Zealand coast they damage the convoy and send the escort cruiser back to base. The Japanese subs have done amazing. The naval aircraft in the South China Seas damages two US subs. Nimitz gets a furious phone call from Roosevelt.Weather is Fine everywhere again.
Commonwealth, France and US both choose Naval impulses. The French fleet moves to Oran. The Senegalese volunteers are transported to Oran. Italians try to intercept the French transport. but fail. The Royal Navy amphibious ships transport French North African volunteers to Bone and remain able to move them for rest of Turn. Convoys are escorted all over the globe. New convoys are sent to reconnect Australia to the US. Japanese subs send some back to base but they get replaced. US marine divisions go on a Royal Navy transport in the Timor Sea waiting to invade somewhere. A Royal Navy transport sails from Australia towards the US. The US Pacific Fleet damages the convoy in the Solomons sea zone and sends the escorting cruiser back to base. Rabaul base is now cut off! US planes fail to find convoys in the Timor Sea. In the South China Seas zone a mass of Allied subs sink 3 tanker points but a Royal Navy Sub is sunk. Bradley HQ is Transported to Corsica and evades Italian planes in the West Med. Tank busting typhoons disorganise a mechanised corps in Bremen. P38s disorganise a panzer corps trying to escape the US pincer encirclement. Other US planes rebase to the South of France. Stalin chooses a Land impulse. He moves units by rail to Rumania. He rail moves an infantry HQ to Siberia next to Vladivostok. He launches a massive attack to expand his bridgehead south of the Oder. He sends aircraft to groundstrike the defenders. Then he launches an attack. Stukas and medium bombers rush to defend. Bridging engineers help a Soviet tank army cross the Oder. They force the Germans to retreat but half the attackers are flipped over thanks to the efforts of the German tactical air support.
Mussolini chooses a Naval impulse. Escorts move out. Subs move to both Med zones but search for convoys only in the East Med keeping the West Med subs free to intercept. Italian subs in the Bay of Biscay do well - they send the US and Royal Navy convoys and transports back to base. Mussolini is reluctant to have his best sub damaged so uses surprise points to reduce the escorts attacks on to him to be only sent back to base. Hitler chooses a no-cost combined Impulse. Hitler decides to send the U-boats out instead of sending out escorts to protect the Swedish convoys next Turn. He tries a mass u-boat attack in the Faroes Gap. Coastal Command Catalinas damage one u-boat and send another back to base. In the US east coast the antisubmarine ships damage one u-boat and send the other back to base. Hitler snarls. He then launches powerful air ground strikes on Zhukov and Soviet armoured forces protected by German fighters. In a horror show for the Germans one fighter is shot down. The bombers get through and the tankbusters disorganise the best Soviet Guards tank army and the engineer. Hitler hugs Goering. Now the strike on Zhukov and a mechanised corps go in. One Soviet fighter is shot down along with a German bomber. The remaining bomber flies over and disorganises Zhukov! The Luftwaffe may have saved Berlin (this Turn). He moves as many of his Western forces as he can to form a barrier to the Western Allies. He gambles that the Soviets won't be able to reach Berlin now so he flips Guderian HQ in Berlin over and reorganises two good FTR2s and the Hs129 tank buster ground attack and a mechanised corps. Rundstedt HQ also flips over to reorganise 3 armoured and mechanised corps and a Stuka. Hirohito chose a no-cost Combined impulse and moved an anti submarine vessel into the South China Seas and a tanker. Yamomoto moved closer to the front line by Rail then spent OPs to reorganise himself.
Weather is Fine except in N Monsoon and Arctic where it is rainy. France chooses a Land Impulse. The US chooses a no-cost Combined and moves convoys in to replace those who sent back to base. Carnage in the South China Seas as 2 tankers and one convoy are sunk and the anti sub warfare ship is sent back to base. The rest of the subs are sent back to base but another Royal Navy sub is sunk. The Japanese light cruisers and naval aircraft have caused a lot of damage to the Allied subs but large scale disruption especially to the tanker fleet has been caused. The convoy in the Timor Sea is found and sunk and its escort sent back to base. The US spends 3 OPs to invade an undefended E Timor and move an additional US infantry unit in West Germany. (The Commonwealth spends an OP to use the Transport). Devers HQ moves by rail to Cologne. The US attacks the two German corps just east of the Rhine and destroys them both for no losses. More air units rebase to South France. Eisenhower HQ flips over to reorganise the two disorganised corps next to him and the railed mechanised corps and a P38 fighter bomber. The French in East France move towards the border area where Switzerland, France and Germany intersect. The French Tank Army in North Germany moves North to allow British motorised infantry to join the attack on Bremerhaven. Churchill chooses a Land impulse. He spends two Offensive Points to move tankers and convoy points into the Bay of Biscay. A ground strike by Wellingtons on two German infantry corps west of Magdeburg fails to achieve any results. The combined Franco-British attack on Bremerhaven sees the weak garrison corps destroyed. The Commonwealth attack on Hannover destroys the two corps. The Allies suffer no casualties nor disorganisations. The British capture a German synthetic oil refinery.
Stalin chooses a no-cost Combined. Expanding the bridgehead at Breslau is going to be tricky but if he waits any longer he fears the Luftwaffe will make it impossible with more devastating ground strikes in their Impulse. He sends a sub into the Baltic but it fails to find any convoys. He swaps Rokossovsky for the Koniev HQ (his second best general) which moves in its stead to the salient south of the Oder. Awo soviet ski divisions rail move into Vladivostok and nearby. The Red Air Force sends in a tough IL2 unescorted to ground strike the German armoured forces north of this salient and it survives interception by German fighters. It disorganises one of the panzer corps. Stalin spends all but two of his remaining Offensive Points to have a doubled Offensive attack values with the Koniev HQ. Rounding up the remaining Soviet mechanised forces that are still organised even though they are over the river without organised Engineers and committing himself whilst Manstein flips over to add his superior generalship to the defence the final odds will depend on the results of air support on both sides. The Soviets shoot down the German fighter. The HS129 is turned back but the plucky Stuka gets through with its 6 support factors. A Pe2 comes in for the Soviets. The Soviets force the Germans to retreat with half the Soviets disorganised and no casualties on either side but the Soviets now have a bridgehead over the Oder.
Japan chooses a no-cost Combined Impulse. Japan decides to wait 2 impulses to reorganise the mechanised corps then reorganise Yamamoto. A massive air effort leads to a poor Japanese fighter being shot down and the Chinese fighter gets sent back. Mao supports the defenders. The Chinese choose the assault table. One Chinese infantry army goes on the Production Circle and one infantry army and An oil tanker moves into South China Seas zone so that at least one Oil can reach the homelands from Netherlands East Indies. Yamashita HQ flips over to reorganise the convoys that had sent back to base by Allied subs so they can go back to see soon. Yamamoto HQ flips over to reorganise the mechanised corps, artillery division and fighter unit. Italy chooses a Land impulse. Seeing the build up of French forces they retreat ground forces into the Alps. They rebase a fighter to Taranto. Hitler chooses a Land impulse and moves his reorganised armoured forces to east of the Elbe whilst some forces remain in the West to slow down the US and Commonwealth. Southern German forces remain to stop the US, French and Commonwealth forces in Southern Germany from joining the drive on Berlin.
Weather is Fine all over. The US chooses a no-cost Combined Impulse. They launch a combined paratrooper and marine assault on the hex next to Rabaul and take the hex with no losses nor disorganisation. In Europe their armoured forces surround the panzer corps northwest of Nurnberg - in their attack they obliterate it. Churchill chooses a Land impulse. Commonwealth forces swarm up to the Elbe and launch an attack on the volksturm defending Leipzig and destroy them pushing onto occupy Dresden beyond it. More resources flow to the British Empire - they might lend some to the French as they have more than they need for themselves now. Apart from the area of Hamburg and between the Elbe and Oder and some defenders in Munich and Nurnberg the whole of Central Germany is open to the Western Allies.
Regular followers of the blog will know I often make big mistakes. Yugoslavia joins the Allies if the Commonwealth or France get 4 corps in adjacent countries which I thought included Austria but apparently it means Germany. So Yugoslavia should have joined the Allies at the end of last Turn or maybe even before. So I will get them to join now as a Commonwealth as they had four corps in Germany first. And so will deploy them and move them as if joining in previous Land impulse with a response from Germany and Italy and then move them this Impulse. Yugoslavia places its forces in a defensive posture on the Hungarian border and the Albanian border whilst being poised to occupy Trieste and nearby Italian resource. They have a mechanised corps which will be available next Turn. The Italians will have rail moved a militia corps to occupy Venice. Seeing the US build up in Corsica and a possible paratroooper corps attack in South France or Italy and potential Allied landings in Yugoslavia they move a motorised corps towards Yugoslavia. They decide to form a more compact defence on the border with France rather than in south France. Yugoslavia moves during the first Land impulse to take Trieste and the resource hex during its first Land impulse. The Soviets move their forces in the Carpathians up to the Danube as the Germans will be distracted by the Yugoslavs to the south. The Germans move a mountain corps south to guard the border with Yugoslavia and a Hungarian cavalry corps to protect the Austrian oil hex.

During the second Commonwealth Land Impulse (their third impulse) the Yugoslavs move the mountain corps into Trieste. It has a factory so 2 out of 4 possible conditions are fulfilled to conquer Italy- only 3 out of 4 are needed. The Allies need to now either capture Rome or have greater garrison value than Italy inside Italy. The Yugoslav cavalry seize the Italian port Zara on their coast.
Now let's continue the Impulse. Stalin chooses a Land impulse. The Vatutin HQ moves to the border with Manchuoko and is joined by a ski division. Pe2 bombers attack the Germans guarding the gap between mountains and disorganise the panzer corps. A concentric attack goes in and the Soviets choose assault. The Germans retreat but a Soviet mechanised army is destroyed and all the attackers flip over. A tank army moves into the vacated hex. Rokossovsky HQ flips over and reorganises the tank armies involved in the recent battle. China does little.
Italy chooses a Land impulse. They move forces into the mountains on the Italy- France border whilst railmoving and land moving forces towards the border with Yugoslavia. Hitler calls a no-cost combined and surrounds the advanced tank army near Brno and rolls high destroying the tank army with only the supporting V.Leeb HQ flipped over as a result. For his naval move he thinks about protecting his convoys but instead sends his High Seas Atlantisher Fleet in a last death or glory charge to destroy the Allied convoys in the Faroes Gap with some air cover. The Royal Navy cruisers just fail to intercept the German fleet in the North Sea but the Germans fail to spot any convoys in the Faroes Gap.
Japan chooses a no-cost combined impulse. They move the anti submarine ship warfare ship and convoys back into the South China sea zone. Finally the Japanese can attack Sian. Many forces attack with several units having their combat value doubled by use of almost all of Japan's remaining Offensive Points. Many bombers with fighter escorts penetrate the Chinese P40s fighter screen. Both Mao and Yamamoto flip over to support their troops. On the Assault table the Japanese lose their mechanised corps but force the Chinese defenders to retreat and all the attackers are disorganised. They have captured Sian but can't use the blue factory there but at least get to use the resource there. The Japanese wish they had held onto Lanchow as if they had they would have eliminated the Chinese Communist faction as that is the only factory city they hold. Still whilst the Germans are losing whole chunks of their homeland, and Italy has lost a city, the Japanese are advancing in China at least. The Chinese communists ask their Soviet comrades for help. Stalin tells Mao help is coming but probably not until 1944.
To the Axis relief it rains in North Temperate and North Monsoon (China wishes it happened earlier too). Churchill chooses a n0-cost combined impulse. He moves the Mediterranean fleet to Tripoli and the Home Fleet into the Faros Gap to find the Kriegsmarine but fails to find them. He sends infantry to grab another resource hex. The US chooses a Land impulse. In the rain their forces in France flow eastwards and surround Nurnberg and with air strikes disorganising the defenders they take the city without loss or disorganisation. Air units rebase including in the Pacific and the night fighter provides air cover in the Faroes Gap. France in a Land impulse liberates Lyon with the help of US National Guard. In southern Germany they approach the Alps and Munich. In China little happens.
Hitler chooses a Naval. He sends his obsolete cruiser into the Faroes Gap and sends escorts out into the Baltic to protect the convoys next Turn. In the Faroes he rolls well enough to avoid air combat for a surface action. He sinks 3 tankers and damages the other 3. Two German cruisers are sent back to base. In the next round the Allies have the advantage and in the air combat the US fighter shoots down one German naval aircraft and sends the other back to base. Only one cruiser is sent back to base - the Bismarck- makes its saving rolls. Hitler knows he might not be able to send his fleet out again. There is no further contact. The Kriegsmarine have done well. Italy continues its retreat from France and moves air units from Munich to northern Italy. Japan passes. The Turn continues.
The weather is Fine everywhere. The Commonwealth chooses a no-cost combined impulse. They move 6 tankers from the US east coast to replace the lost tankers in the Faroes Gap. Subs go into the Italian sea but fail to find any convoys. The US chooses a Land impulse and spends 2 Offensive points to move 6 oil tankers to the US East coast to carry oil for the Commonwealth. The naval aircraft find and attack the two remaining German ships. Bismarck's repels many determined assaults but it is damaged and its accompanying cruiser flees to base. The u-boats have been blunted and the naval aircraft and Kriegsmarine wrecked.The US forces surge around Germany. The French also in a land impulse join a ring of steel surrounding the railway siege guns and infantry outside of Munich and with the US annihilate them. Munich is surrounded and will surely fall soon. The British grab another resource hex and face Prague across the Elbe. US fighters rebase including to Makassar in the Pacific. But the big news is Monty tries to cross the Elbe across from Berlin with an Offensive points boosted double attack value and 3 other armoured and mechanised corps with engineers to help one corps attack at full power and massed air attack with US fighter support. The Luftwaffe throw in a fighter to try and stop the Allied ground support but its beaten back. The 88s in Berlin open up in support and drive back some RAF planes. The powerful Herman Goering Panzer corps tries to stop the Commonwealth but is run over with Tempest tankbusters doing much damage. The Allies suffer no casualties and advance two corps over the Elbe next to Berlin. Stalin is fuming! The Brits may beat him to Berlin. Churchill spends further Offensive Points to reorganise the Montgomery HQ. Stalin chooses a Land impulse. He rail moves the cavalry mechanised group to Siberia. He doesn't think he can get enough a good attack in anywhere and fumes. China does little. The Turn continues.
Germany and Italy choose Land impulses. The Italians in the German/ Italian border retreat further into a narrower line abandoning contact with Munich. Units from Hungary and Czechoslovakia facing the Soviets move westwards to reinforce the garrisons of Vienna and Prague and to protect the Austrian oil hex (Germany's last source of oil). The two infantry corps in Munich retreat southwards into the mountains to try and pose an awkward problem rather than be attacked at 5:1 odds in Munich. The Germans scrape together their emergency operational reserves. Rommels lead counter attack to drive back the Commonwealth bridgehead. Along with 3 panzer/ mechanised corps and an 88 division which can attack armour with a doubled value. Mosquitos fly in ground support and the artillery division across the Elbe fires in ground support and Monty provides support too. The Luftwaffe tries to intercept but is shot down by the Mosquito fighter bomber. The Commonwealth uses its Bofors AA guns in the anti tank role. The Germans come close but just fail to throw back the Commonwealth in a blitz and lose a mechanised corps and flip over. Japan passes. The Turn continues. Hitler groans in frustration. His bad mood is compounded by the fine weather except rainy in North Monsoon zone and the Arctic.
The Western Allies choose a Land impulse. Churchill could widen the bridgehead but has a chance of success at hitting Berlin with all the defenders being disorganised. Gort HQ rail moves to Magdeburg. Commonwealth along with the Americans move to attack Prague. The French in south Germany occupy Munich and along with US troops face off against the German infantry in the Alps. US forces also surge east towards Vienna. Monty true to character goes for the more cautious approach using the paratroopers to attack the hex to the northeast of the bridgehead and engineers to aid a tank corps crossing the Elbe. The German panzer corps, 88mm division and a flipped over medium bomber are all destroyed. Stalin rail moves a strong infantry corps to Siberia. There is little movement. The Turn ends. Hitler sighs with relief but the writing is on the wall for Germany.
A partisan turns up in the mountains on the resource hex. The Soviets draw a high value chit. They will be able to declare an attack on Japan any time they wish especially with the build up of forces in Siberia. There are 29 victory objective hexes in the Asia/ Pacific map. For Japan to win I'm going to say they have to win half (15) but they currently have 13. The two most gettable are Lanchow (which they had once) and Chungking (the Nationalist and de facto Chinese capital). For Japan to be defeated I'm going to say they either have to go down to 7 or be invaded. Ships return to base. A transport in the North Atlantic heads to San Diego. The Royal Navy Home Fleet heads towards Gibraltar with the Kriegsmarine surface fleet being decimated.
China produces a weak infantry army and garrison division- both Communist. A strong Nationalist infantry army is finished. Next Turn the British promise France some German resources but currently they do not have enough resources for their factories. They raise all 3 militia corps and rush complete two engineer divisions and come close to finishing their carrier plane. Italy's shrinking resources leaves it with only 5 build points. It completes land units and begins rebuilding a god fighter unit. Germany has lost most of its resources and many of its factories. It also needs to keep some oil. It gets 9 build points from destroyed units and only 5 build points after the effects of strategic bombing and keeps one oil. He completes several land units including a mechanised corps and churns out more fighters. Japan can transport one oil from the East Indies to Singapore and one oil to Japan plus keeps the synthetic oil generated in Japan. It has 22 build points including a build point from a destroyed mechanised corps. Japan continues to build carriers, armoured troops including an HQ, carrier planes, 5 build points, tankers, convoys and some Indochinese territorials. Japan will be out produced badly especially since the Allies will be shifting production towards the war in the Pacific.
The Soviets with plenty of resources from Europe stockpile 4 oil in Siberia. They complete ground attack planes and a fighter, complete a sub and an engineering division and hurry the production of Vasilevsky HQ and begin the final production cycle of another sub. Stalin invests heavily in 20 Offensive points. Japanese spies report their concerns to Tokyo. The Commonwealth transports resources from Europe including oil along with resources. They have 31 build points. They build a mix of land, sea and air units as well as 15 Offensive Points. As the US doesn't have to support the UK with resources for their factories they get to save 6 oil counters this Turn. Hitler lets out a sob. The US scales a bit back on the European front production and increases Offensive Points to 30. The Pacific continues its mix of land, sea and air units plus repairing a sub and some US & Commonwealth transports, tankers and convoys. The US is again building a lot of air units including carrier planes. The Turn ends with Bletchley Park getting 6 intelligence points for the Commonwealth. Very useful.
The writing is on the wall for Germany. Can it survive till 1945?


Comments
Post a Comment